Ever since I started food blogging I’ve been wanting new food backgrounds but couldn’t find them anywhere. I checked in ikea and found wood pieces that were too shiny and didn’t work well. Over the past several months I’ve been using a simle white and black chalkboard and soon started feeling as if my photos were getting a little boring. I’m sure my reader’s are getting tired of the white/black as well because let’s face it, who wants to look at boring food photos?
A few weeks ago I ran into this post by Gina@Running to the kitchen who originally adapted it from Lindsey@Love and olive oil. This concept is originally from them but I’ve made a few changes along the way. Lindsey used crafting boards and glued them together and Gina came up with the idea of using plank paneling instead because they basically clip together. She used 8 feet long boards and had them cut in thirds at Lowes. I went there searching for the 8 foot boards but to my surprise found boards that were a perfect 3 feet long which was exactly what I wanted. They are very thin at about 1/4” which was a plus for me because I don’t have the strength to carry heavy boards while photographing.
Here’s what you will need to make 2 boards:
- 1 pack of plank paneling (36 in long) $10
- 1 brown paint sample $2.97 (mandatory for the basic and or color)
- 1 paint sample; color of your choice $2.97 (optional)
- 1 wood glue $2.99
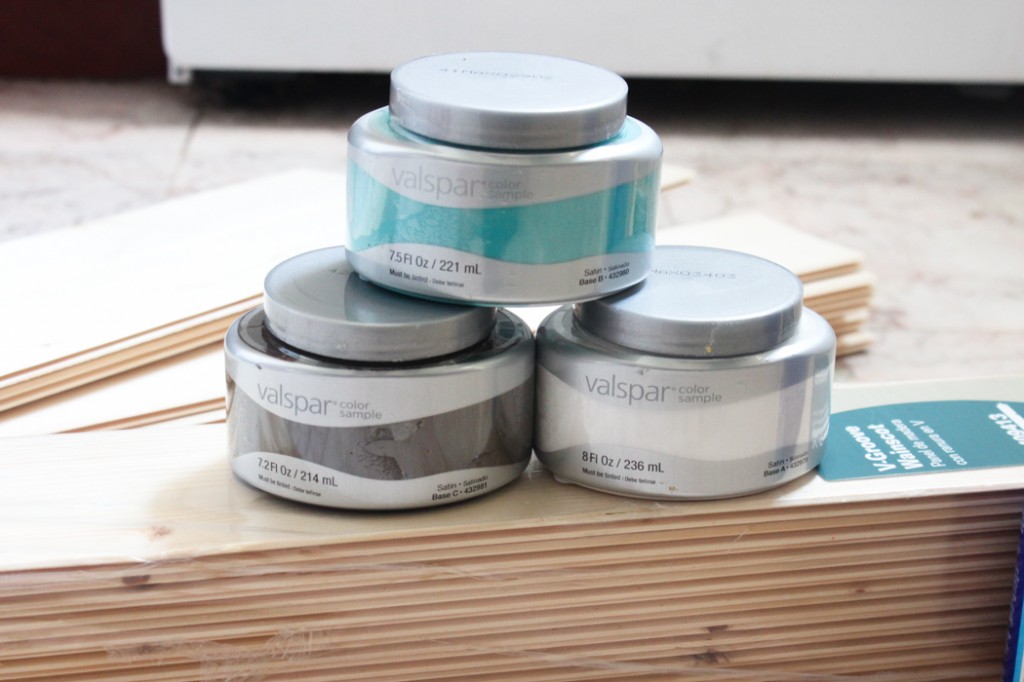
A pack of plank paneling costs about $10 and contains 12 planks which makes 2 boards (backgrounds). I purchased two packs and made 4 boards in total. For the colors, I purchased 3 paint samples for $2.97 each and only used less than half of each bottle. In addition to the paint and planks You will also need glue and a paint brush. Making two board will cost you less than $20. You don’t even have to glue the boards because they clip right into one another but I glued them because I will be moving them around while photographing so I wanted them to be able to hold.
Step 1:
Apply glue to the edges of the boards and clip 6 together to make one board and the other 6 to make another board.

Step 2: Pour half the brown paint mixture into a paint bowl and mix with water until you have a 50/50 ratio paint:water. Keep a dry cloth or paper towels nearby and brush the brown paint mixture on the first board coating generously. After you are done take the cloth and gently wipe the board. You can see the difference below between the board before wiping the paint off and after; the wood looks much more natural and better after wiping. Next repeat the process for the 2nd board and allow the boards to dry for 10-15 minutes.

Step 3: After the boards have dried apply the 2nd coat of paint by stroking small amounts of paint and brushing it quickly. Do not coat the entire board because we are aiming for a distressed look. The more paint you add the less distressed the wood will look. I made 4 boards in total; I left one of my boards with the first brown layer alone because I love how the color turned out. I painted another board with white and one with torques ( although it was not the shade I had in mind..). I also left one board as is without adding any paint at all to it. Although I didn’t do this because I can’t carry heavy things but if you want you can glue two boards together to have a double sided board.
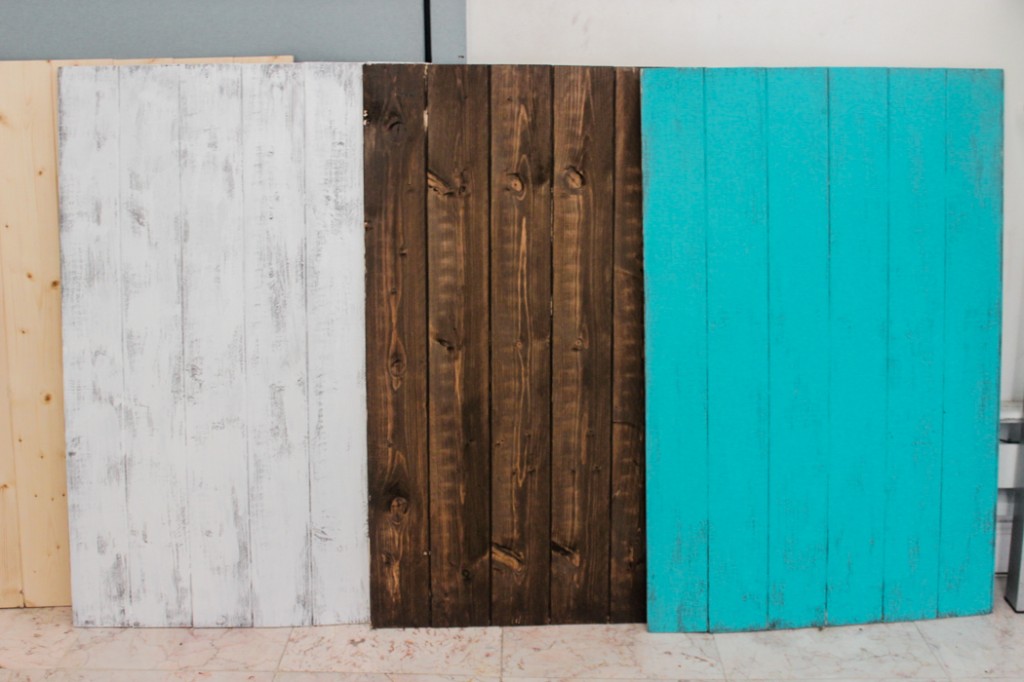
After trying out the board yesterday I was shocked at home great the wood looked in the pictures. It’s amazing ho much the background does for the photos. I’ve only used the white so far and can’t wait to start using all my new boards! I hope this helps!


Awesome, thanks soo much for this. I saw another post for something like this which called for a saw and drill etc – tools and skills I dont have – this is so much easier haha.
Exactly what I’ve been looking for. l’ll be making these double sided. thank you for posting this.
Hi Layla
Thank you for sharing this idea. I love them. I will try with some leftover paint and stain from other projects :)…..
Love this Idea. Can also use it for newborn floor backdrops. May I ask where did you find your pack of planks?
Hey! These look awesome and I’ve been looking for cheap food photography backgrounds for a blog I’m starting…but I’m not exactly sure which ones will look good with some of the tones in the dishes I’ve picked out though. Could you possibly share some links/examples of the photos you’ve taken with these? 🙂
Hi there! Do you have any suggestions on how to make this food safe? I have created a few boards and have painted them with everything from acrylic paints to left over paint from when I painted my bedroom. However I realized that putting food on these boards may not be the best idea because if it sits there for a while….is the paint toxic? not safe to eat off of? And also it would be nice to protect it from damage. Ex. Last time I put some walnuts on there for styling and then I noticed it left behind some grease stains 🙁
Any ideas? 😀
Love this! I’d be considering contact paper but I like this idea better! Do you think it would work to do a different color on each side so you’d have 8 colors to choose from?
Yes, you can use both sides and have 8 colors. One thing to notes, the other side is not the same as the front side, the wood has lots of striped lines. I guess it would depend on the planks you get and how they look on the other side! Best of luck!
Incredibly helpful post, thank you! I was wondering how to make these.
Can I ask a question… What kind of paint did you use? I don’t think all paint would mix well with water would it?!
I love this! I’m so glad you shared this. I picked up a 2×2 piece of wood and paint samples at Lowe’s and followed your instructions for painting. It couldn’t have been easier. I’m sharing the link to this post on my blog.
This is just the info I was looking for! I’ve been trying to think of how I can cheaply and easily make a background. I have an old wood pallet I’ve used but it’s so heavy I can barely move it. Your photographs on the white board came out great!
I love this idea. I saw it the other night and went out to Lowe’s the next morning for supplies. I was wondering if you have had any issues with the panels coming apart after you glued them. Mine seem relatively sturdy, but they do bow and bend some when I pick them up.
Thank you so much for this! Went to Lowes and found the exact products you recommended. My first coat of paint is drying now, I’m so excited to try different colors! Super easy and budget friendly
Love this tip/idea. I went to home depot and they didn’t have the paneling so I just got pieces of wood to glue together. Then I came back and read that you went to lowes =( awe, but I am so excited to paint and put them to use! I am sure it will look just as good. Thanks!! =)
This is great! I have seen the other tutorials you mentioned and was a bit nervous about trying to create my own boards. I love the supplies you used. I think I can handle this!
Thanks for sharing this wonderful information. Lovely !!
Hi Layla,
Thanks for the amazing tips. I really want to learn more about food styling and photography so I am experimenting at the hardware store this weekend!
Just a quick question, with the white and turquoise panels, did you paint them brown first, add some white/ turquoise strokes and then paint the colour over the top???
Thanks so much!
Emma
OMG thanks so much for this! I always see such cool backgrounds on other blogs and wonder how they get em… do they make them? if they buy them, where?!?! Now I just need to find a handyman to whip these up for me 🙂
Love these tips! I’ve always wondered how to do this kind of background. Can’t wait to try to make it. 🙂
Loving these boards! Thanks for sharing!
They turned out so well! I especially like the brown color and the white made the perfect background for for salmon tacos.
Helpful post! I’m looking for these items (or similar) to buy in London…
I did something similar to your process here with a few of my boards, and I also used a bit of an old wooden fence for another… but I love your idea of the paint/water ratio and then brushing off a bit with a cloth to give it that natural look… that brown board looks beautiful!
Yea, I saw your tutorial a while ago and LOVED your boards! I was going to go with your idea at first but considering that I live in the city and don’t have anyone to help me I decided to go with the paneling.
Thanks, Layla. Finding background that suits you can be a challenge. And then you get bored with it…and want something else. Great tutorial, keep them coming…:) ela
Awesome tutorial, Layla! I was just thinking that I wanted to try my hand at making my own photography backrounds. I so can’t wait to try this! 🙂
I love all of your photos, and I’m sure they are going to be even more fun once you break out the other boards! This is a great idea, and looks like a lot of fun to do.
This is so great! And never bored with your photography backgrounds. It’s all about the food! But I bet that blue one will complement some great dishes : )
Yes great food is a must! I can’t wait to work with the blue one!
Love this! I’ve tried and had terrible luck painting faux barnwood, I think the 50:50 water ratio would’ve done the trick!
I can totally relate to you Kelly. Painting is harder than it looks! The 50:50 ratio makes the process much more easier.
I recently did this but used scraps of wood wiped them down and then painted them. I love the colours of your backdrops. Ypu could paont the ptherside and have 8 different colours in total
I was going to do that originally but the backside is not the same as the front, the back has extra lines. Technically I can still use, I’m thinking of painting the backs and using them as side props!
Where can i get those planks
Home Depot and Lowes if I’m not mistaken.
I’m going to send this post to the.boy and tell him to go forth and make these for me! Thanks for the tutorial!!
Great idea! Wish I had someone to do my handy-work 😀